Dorn Selfhelp
The Dorn Method - Selfhelp exercises
A Yes to Self Responsibility and a No to Back Pain
Additional DORN selfhelp exercises:
Lumbar - knee - ankle - shoulder - elbow - hand - finger - thumb - TMJ - SC - AC - Ribs - Humps
» see also: The basic 4 DORN selfhelp exercises: Hip-Sacrum - Spine-Neck
The DORN Method Self Help Exercises are designed to simulate and repeat the procedures and actions demonstrated by a DORN practitioner in a practical manual session and are the most important part of the DORN Method.
Although the DORN Selfhelp exercises cannot fully replace a practical manual DORN session they can and should be done, even without prior coaching in a practical session, to induce structural re-balancing and help to prevent spinal problems before they appear.
» In any case it is advised to see a health professional first before starting any exercise program!
General recommendations for the DORN Method selfhelp exercises:
To achieve the best results the exercises should be done regularly, best several times a day for the first two months following a practical DORN session, then at least once a day after that time for maintenance and prevention.
- Do not exercise after any injury following an accident and do not exercise if you experience fever, migraine or inflammations.
- The exercises must not cause any pain while doing them and it is best to repeat them more often than doing them too intensive.
- Do not hold your breath during the exercises.
- All exercises must be done balanced on both sides of the body regardless where the problem is!
- Get instructions how to do the DORN selfhelp exercises from a DORN practitioner or visit the DORN selfhelp webapp
www.dorn-selfhelp.org
This however should be accompanied by the prevention (avoid wrong movements) and maintenance (muscular treatments like deep neuro-muscular massage and correct muscle training, the 3 tools for Self Healing!
Although the DORN Method selfhelp exercises are very safe if done gently and in the correct way it can not be excluded that the body is reacting in unpredictable ways. The application of the DORN selfhelp exercises is under your own risk and responsibility.
Additional DORN selfhelp exercises:
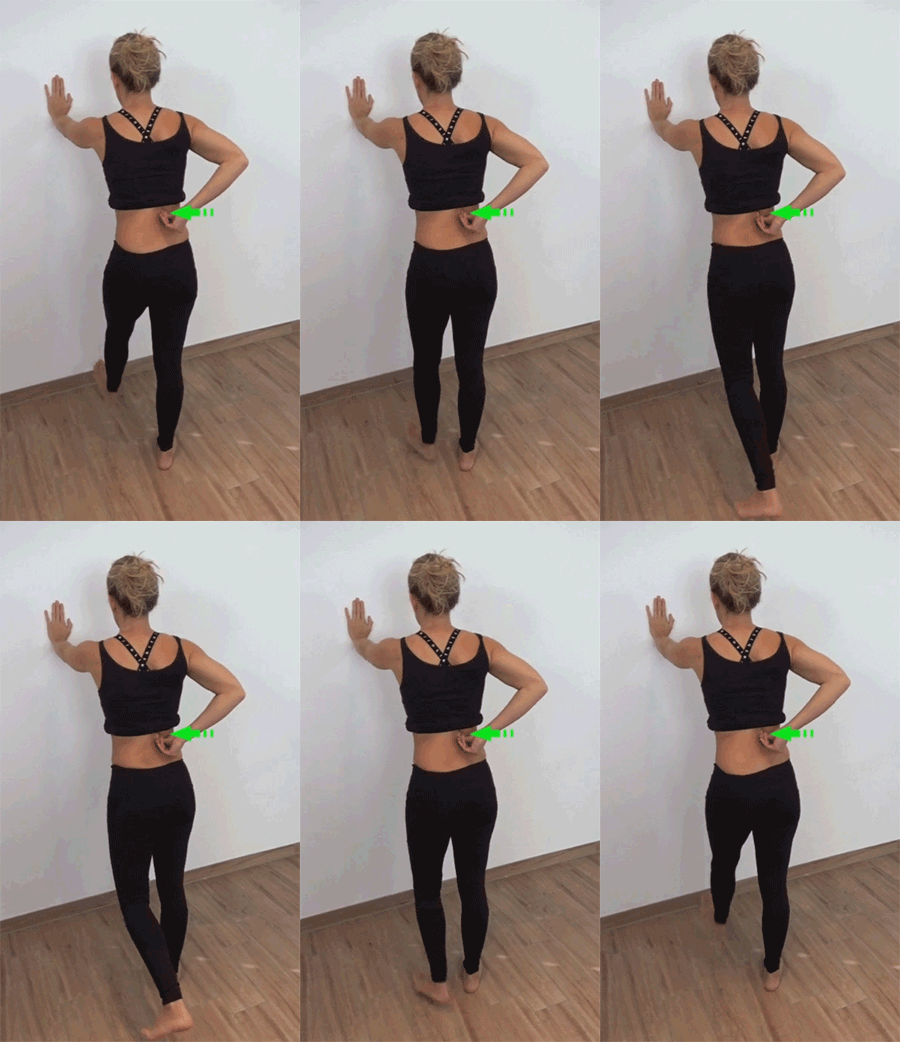
Lumbar selfhelp exercise:
How to do this exercise:
Stand with enough distance at a wall, doorframe or next to a stable chair and apply careful pressure directly beside the spinous processes of the lumbar spine with the thumb of one hand while the other hand is holding onto the wall, doorframe or chair.
Apply the force directed towards the center of the spine (= to the opposite side) while one leg is swinging front-back. You can also change the side you stand on and the leg that is swinging.
Start on the upper most reachable vertebra of the lumbar area (if possible L1) and step by step move downwards to cover the complete lumbar spine.
You may also repeat this with a sliding motion of the pressing hand downwards.
Always re-balance both sides of the spine.
Breathe normal and stay relaxed.
Time required: Approx. 1 Minute on each side.
Knee selfhelp exercise:
How to do this exercise:
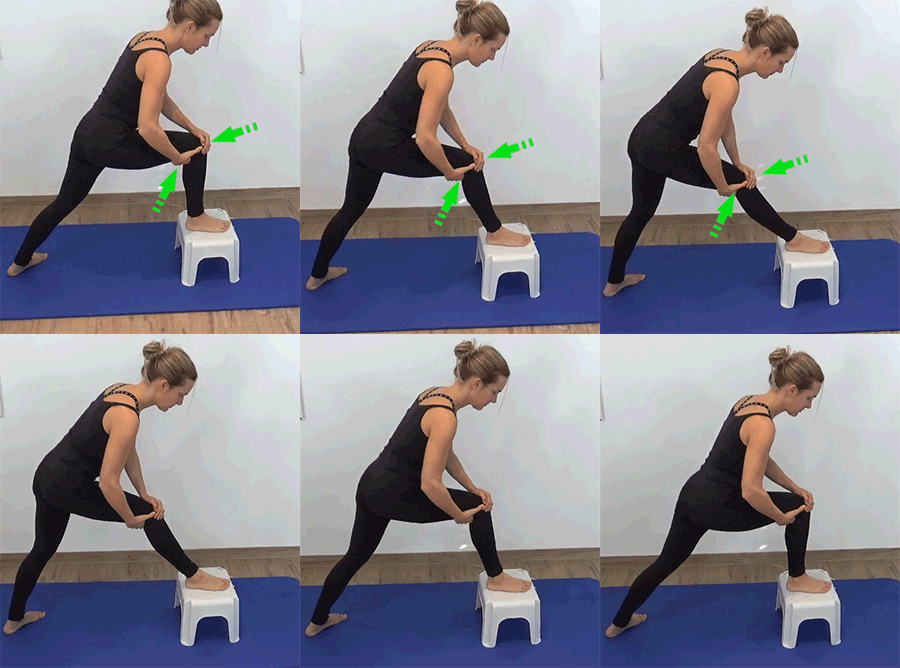
Standing with bended knee on the floor or a small stool (recommended) the other leg straight to the back. One hand is carefully giving pressure onto the knee directed towards the pelvis while the other hand is at the inside of the knee-joint giving pressure directed upwards and to the front.
Keeping the pressure or gradually increasing it the bended leg is then straightened backwards while one exhales. On the way back to start position one inhales and repeats the action several times for approx. 30 seconds or longer.This is then repeated on the other side the same way.
Ankle selfhelp exercise:
How to do this exercise:
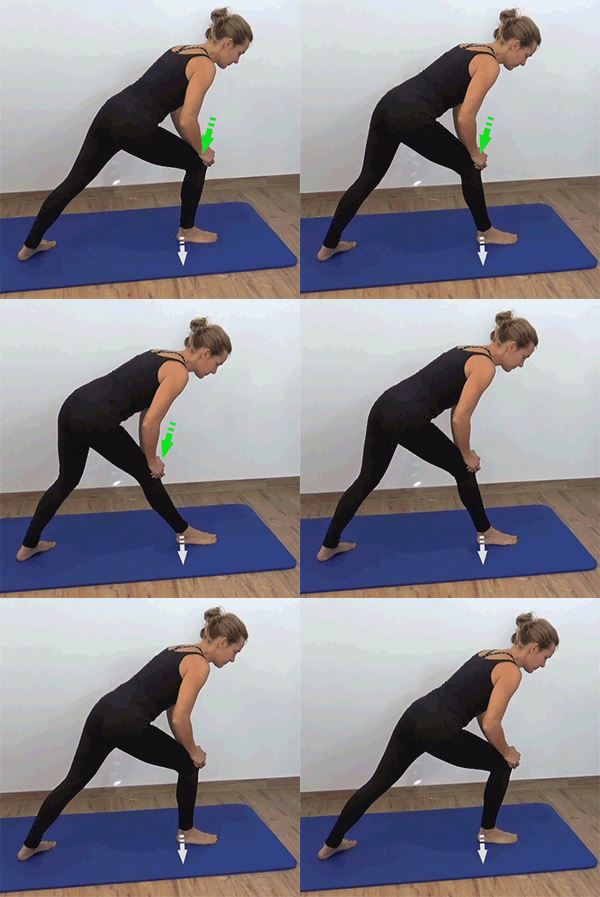
Stand on the floor with one leg to the front and bended knee. Apply pressure with both hands onto the knee directed downwards to the heel (foot).
At the same time apply pressure with the heel (back part of the foot) onto the floor.
Maintain the pressure and move the bended leg backwards until it is straight while one exhales.
Inhale when moving the leg back to the Start position and repeat this several times.
After approx. 30 seconds do the same on the other side.
Time required: 1 Minute
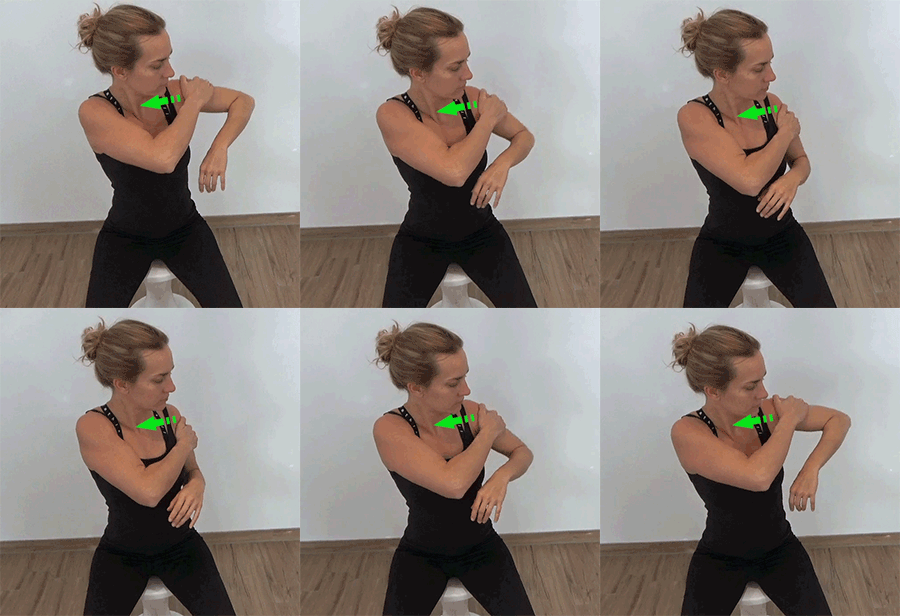
Shoulder selfhelp exercise:
How to do this Exercise:
Lift one arm to the side until approx. 90 degree (only if possible but as much as one can) and hold with the other hand onto the upper arm near the shoulder.
Now apply careful pressure = pull directed towards the shoulder joint and move the arm at the same time downwards while exhaling.
When lifting back to start position inhale and repeat the action several times.
Please always do both sides.
Time required: Approx. 1 Minute
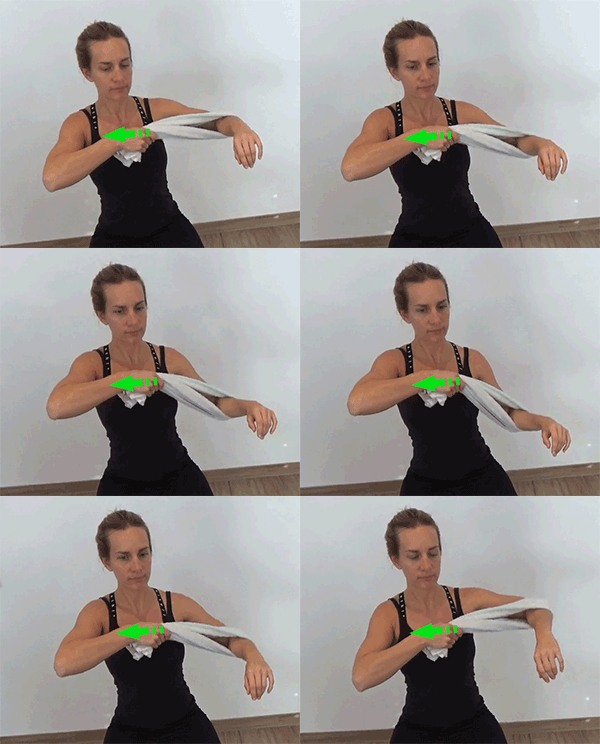
Additional Possibility: Lift one arm to the side until approx. 90 degree (only if possible but as much as one can) and place a towel around the elbow and hold it with the other hand on the tips.
Now pull careful directed towards the shoulder joint and move the arm at the same time downwards while exhaling.
When lifting back to start position inhale and repeat the action several times.
Please always do both sides.
Time required: Approx. 1 Minute
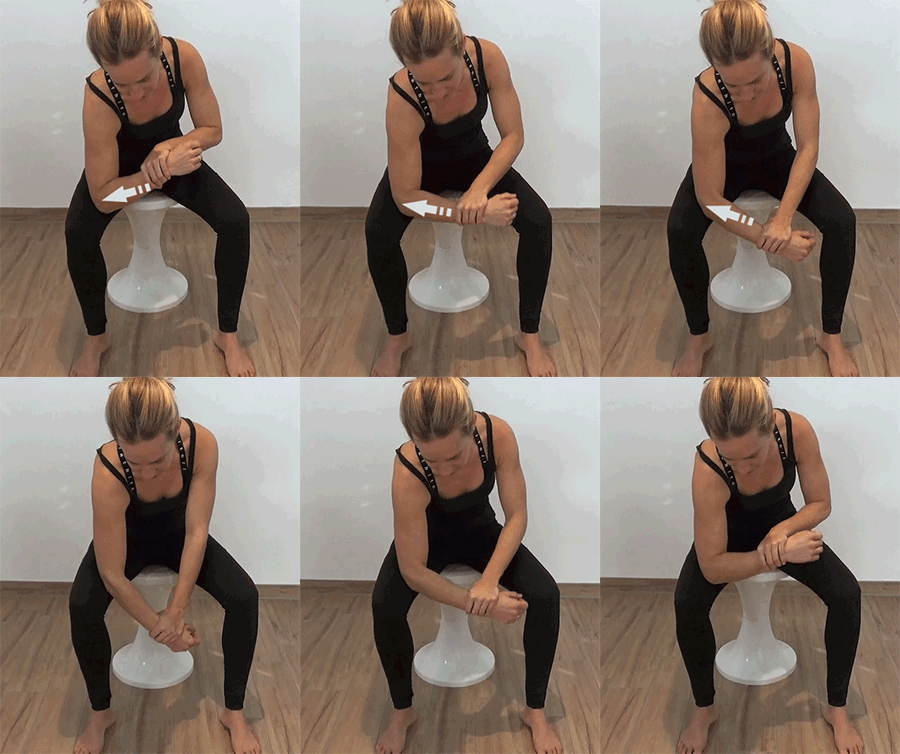
Elbow selfhelp exercise:
How to do this exercise:
In sitting position the elbow of the bended arm leans against the thigh near the knee on the same side.
Grab the wrist of this arm and apply pressure directed towards the thigh while moving the bended arm slowly to a straight position and exhales.
When moving back to start position, without giving pressure, one inhales and repeats the action several times.
Do this exercise on the other bodyside in the same way.
Time required: Approx. 1 Minute
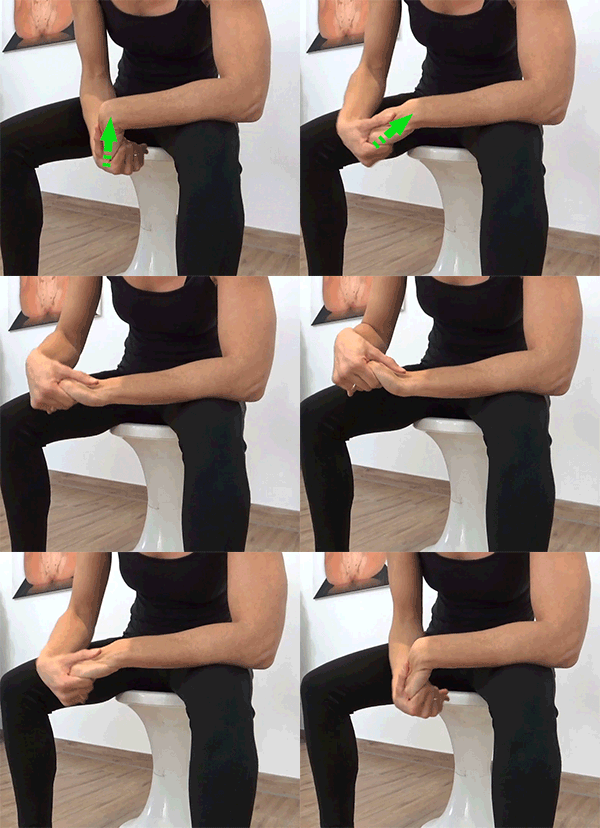
Hand (wrist) selfhelp exercises:
How to do this exercise:
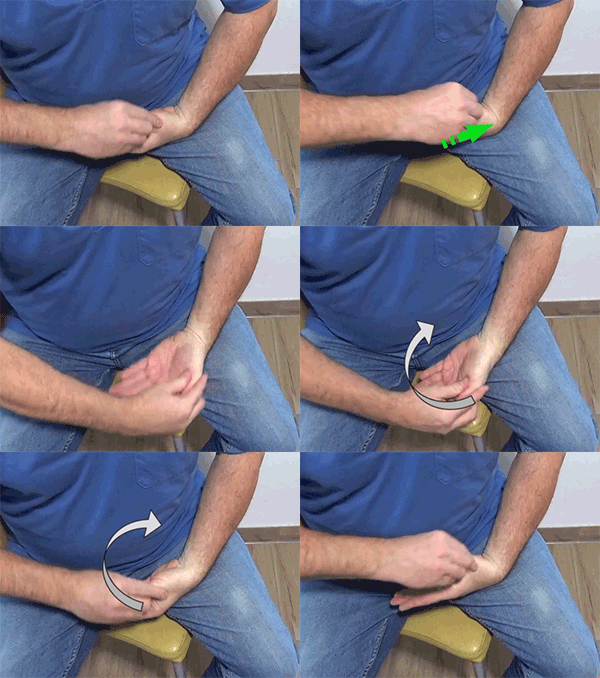
Best in sitting position grab with one hand the other hand with the thumb in the center of the upper side and start by bending the wrist to approximately 90 degrees (only if possible).
Now apply pressure directed towards the wrist and bring the joint back to a straight position while one exhales. Move back down to the start position without giving pressure while inhaling.
Repeat several times and try to increase the force gradfually without causing too much discomfort or pain.
Do the same on the other body side
Time required: Approx.1 Minute (can be longer if necessary)
Finger selfhelp exercise:
How to do these Exercises:
The respective Finger-Joint is moved from the Startposition (= if possible bended up to 90 degrees) to the normal position (= straight) and careful pressure is directed towards the joint while one exhales. On the way back to the startposition one inhales again.
This action is repeated several times while the pressure is gradually increased but adjusted in case of uncomfortable feelings or pain (= pressue intensity, movement)
The exercises are repeated with the fingerjoints of the other hand in the same way.
This priciple is for all joints of the hand with the exception of the base-joint of the thumb.
Time required: approx. 30 seconds per joint
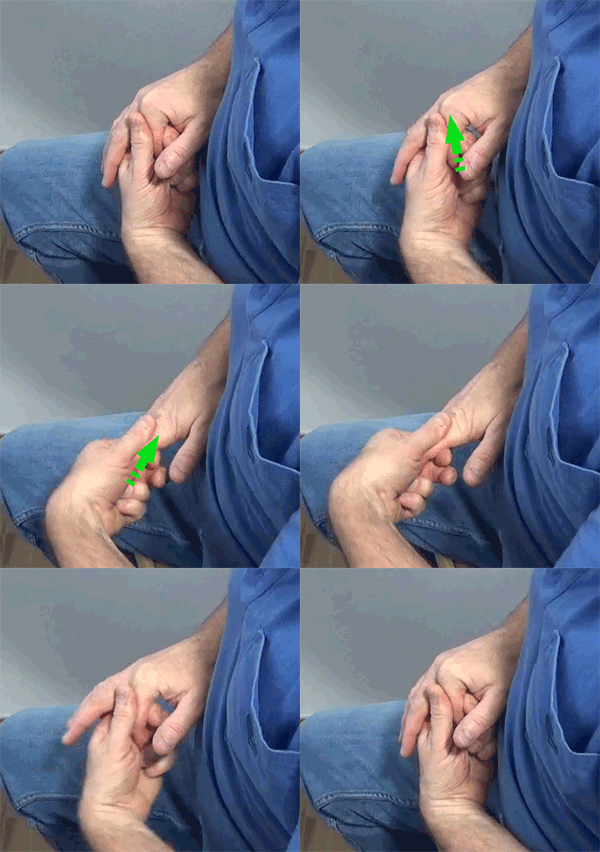
Thumb-base selfhelp exercise:
How to do this exercise:
Place the back of the hand downwards and grab the first metacarpal bone (= first bone attached to the thumbbase joint) with the fingers of the other hand and bend (rotate) the thumb inwards to the startposition. Apply careful pressure directed towards the thumbbase-joint (thumb saddle joint) and move (rotate) the thumb outwards to the normal position (open hand) while one exhales.
Move back to the startposition and inhale again. Repeat this several times and gradually increase the pressure but adjust (pressure force, movement) in case it is too uncomfortable or painful.
Do the same with the other thumbbase (thumb saddle) joint.
Time required: approx. 30 seconds
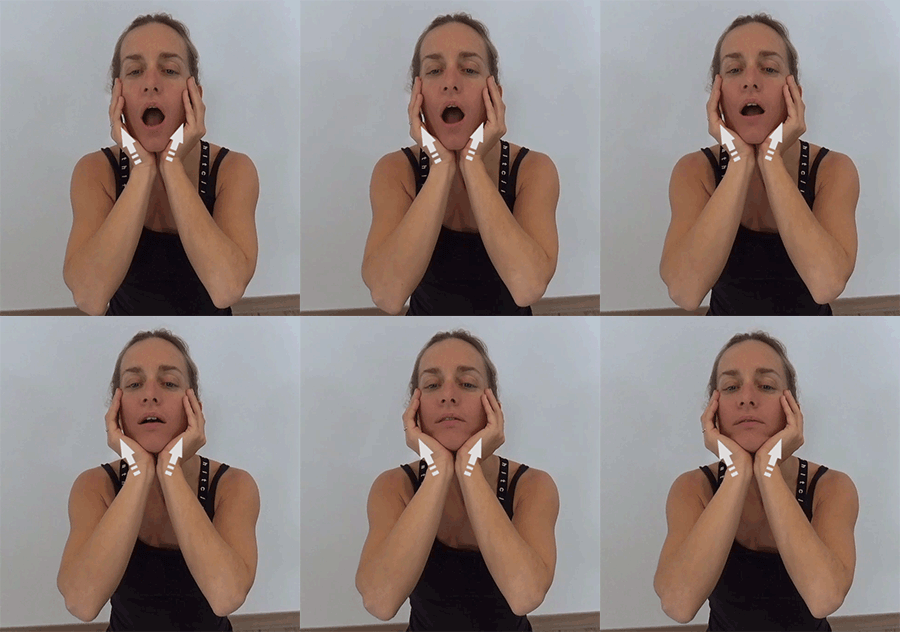
TMJ selfhelp exercise:
How to do this exercise:
Option 1:
Place both hands alongside the lower jawbone and open the mouth wide while the arms move upwards and backwards to apply (guide) careful gentle pressure directed towards the TMJ (jaw-joint). First close the mouth actively and slowly then guide this movement with a gentle extra pressure. The head is kept in position to have a certain counter-pressure during this exercise. Repeat this action several times and it should not be too unpleasant or painful.
It is possible that, while doing this exercise, one experiences some crackling sounds within the joint therefore do the exercise always slowly and carefully.
Time required: approx. 30 seconds (longer if necessary)
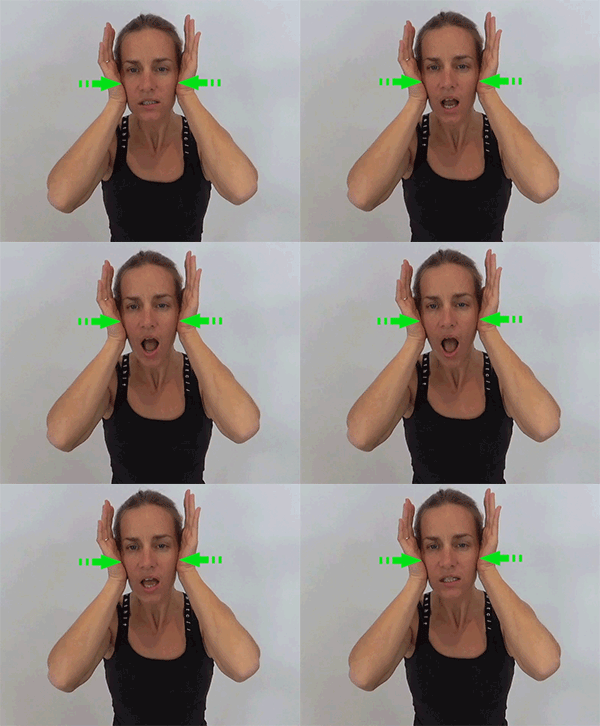
Option 2:
Place both hands with the ball of thumb left and right direktly next (= on) the TMJ (jaw-joint). Now open and close the mouth several times reasonable wide and apply careful gentle pressure directed to the center onto the joint. This pressure can be gradually increased but should be reduced back to a tolerable level in case of uncomfortable feelings or pain.
The ball of thumbs should be positioned so you feel the pressure being centered onto the joint which can be tried out by small changes in the handposition during the movement.
Time required: approx. 30 seconds (longer if necessary
SC-joint selfhelp exercise:
How to do this exercise correctly:
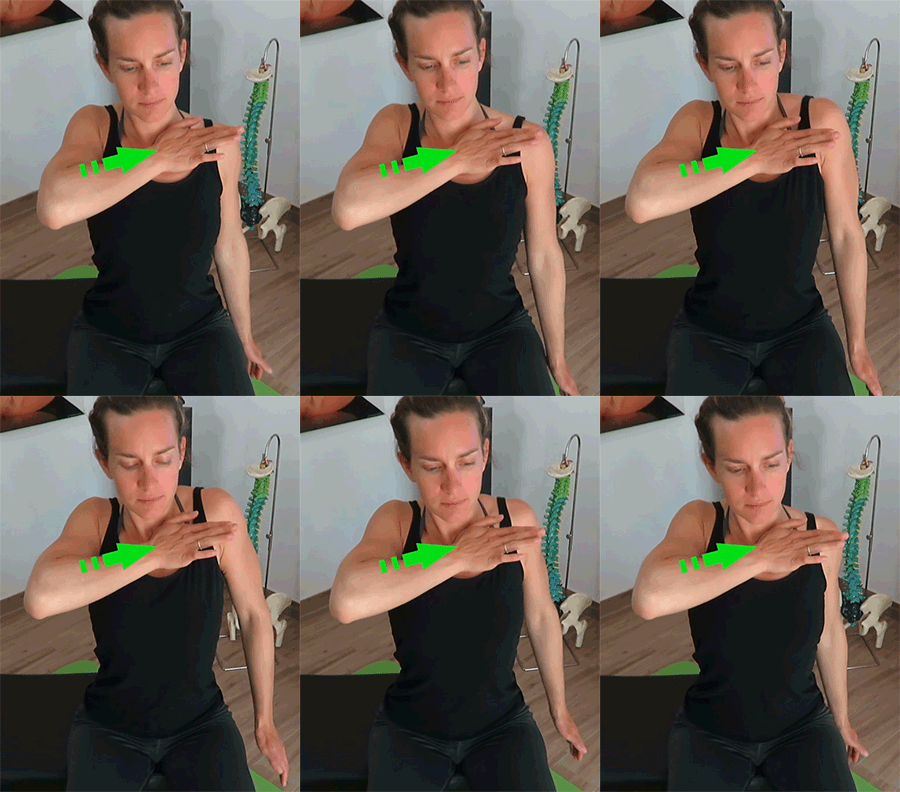
Give careful pressure directly onto the SC-Joint (sternoclavicular-joint) with the hand (ball of thumb) directed a little downwards and towards the shoulder. At the same time rotate the opposite shoulder (only shoulder!) upwards and backwards.
While lifting and turning backwards give pressure and exhale and on the way back to start position relax pressure and inhale.
Adjust force and movement in case it is too uncomfortable.
Repeat for approx. 30 seconds always on boths sides.
It is recommended to do this exercises often (several times a day) for a longer time period.
The improvement in this area requires a little patience and may take quite a while. Through the meridian = TCM (kidney meridian) connection this area is very important and recommended for patients with shoulder, neck or ear problems like tinitus.
AC-joint selfhelp exercise:
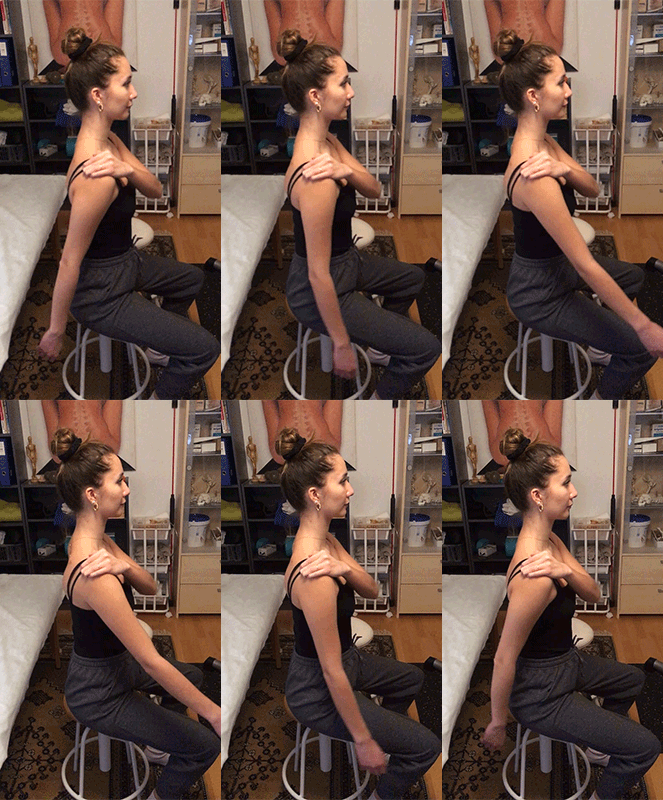
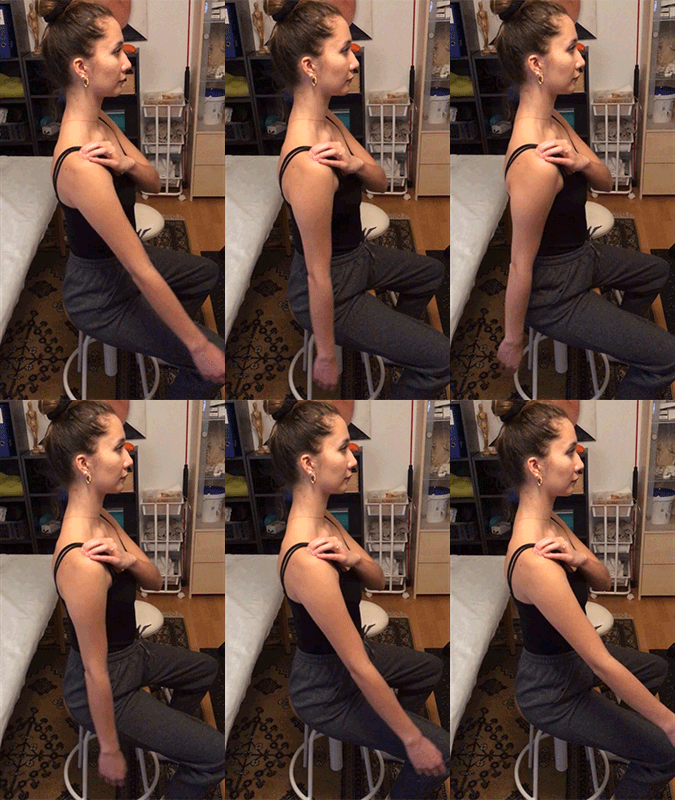
Give careful pressure directly onto the ac-Joint (acromioclavicular-joint) with one hand downwards and squeeze the hand (fingers) together.
Option 2: Give careful pressure directly onto the ac-Joint (acromioclavicular-joint) with the fingers of one hand downwards.
At the same time swing the arm front-back and breathe normal.
Adjust force and movement in case it is too uncomfortable.
Repeat for approx. 30 seconds always on boths sides.
It is recommended to do this exercises often (several times a day) for a longer time period.
The improvement in this area requires a little patience and may take quite a while.
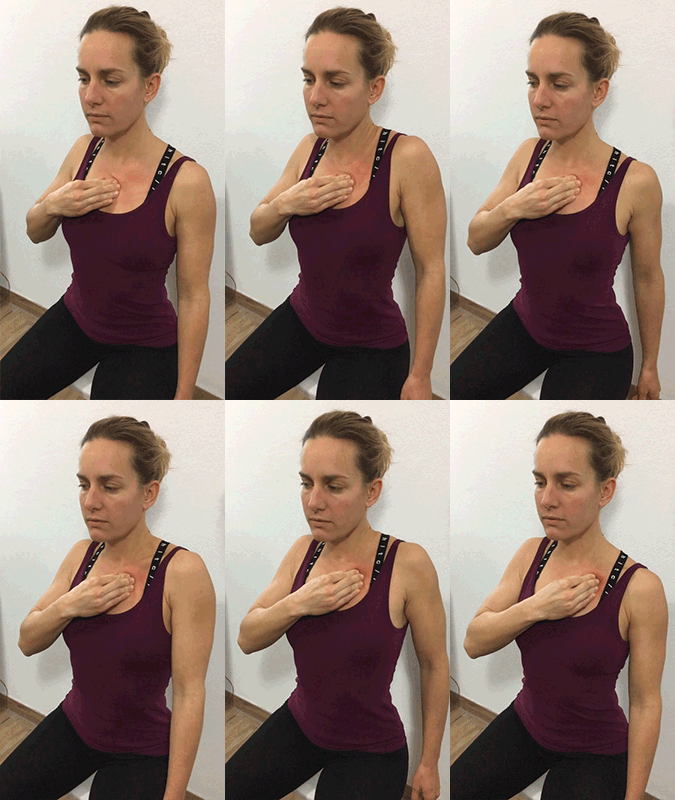
Ribs selfhelp exercise:
How to do this exercises:
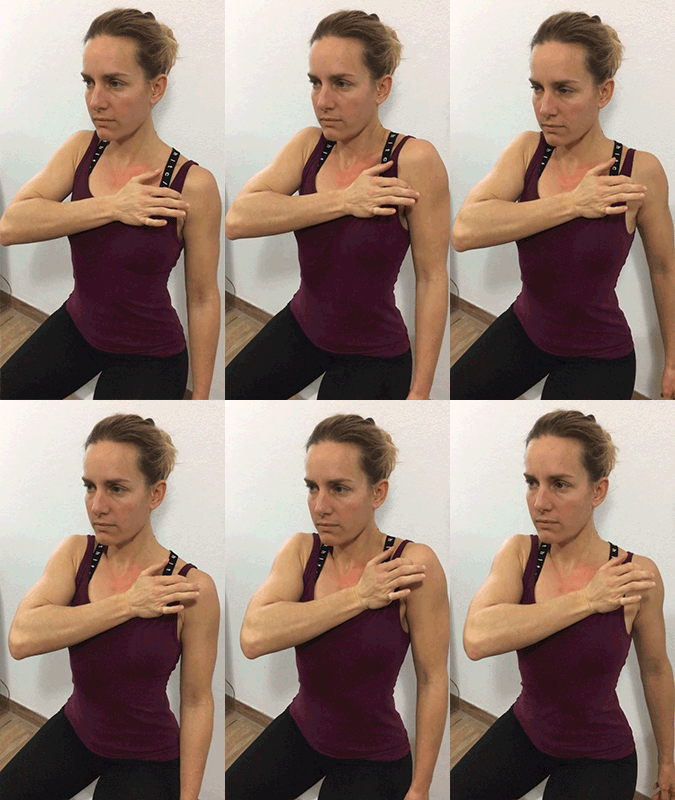
Place one hand with the ball of thumb in the center of the chest where the ribs attach to the sternum and apply careful pressure directed towards the shoulder.
In this example the right hand is on the left side of the sternum and pressure is directed to the left shoulder.
While pressing the shoulder (only shoulder!) is rotating upwards and backwards and one exhales and back downwards and to front when on inhales.
Additional posibility: Pressing with fingertips
The pressing hand now slowly slides outwards while the shoulder rotation is continued.
Repeat this action at different positions of the chest (more up or down) to guide all the ribs to best alignment
Do the same on the other side of the body.
Instead of the hand one can also use the fingertips to apply the pressure.
Time required: Approx. 1 to 2 minutes.
Humps selfhelp exercise:
How to do this exercise:
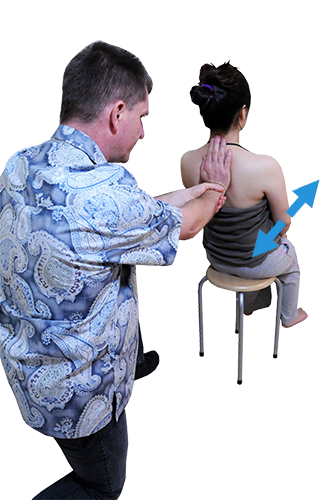
Lean with the hump backwards against the flat part of a doorframe and swing the arms alternate back-front.
picture follows...
Although the selfhelp exercise for humps can be done alone by leaning against a doorframe or similar it is recommended that this is done with the help of a partner (family member).
The new DORN selfhelp exercises webapp:
www.dorn-selfhelp.org
» see also: The basic 4 DORN selfhelp exercises: Hip-Sacrum-Spine-Neck
» Continue exploring the DORN Method: How DORN works
Recommended products:
Spynamics Sacro & Spine Aligners (click for more information)

» Continue exploring the DORN Method: How DORN works
New: DORN selfhelp exercises webapp
» links to: Dorn controversy / Dorn and Childern / Dorn and Animals / Dorn and Meridians / Dorn connections spine-organs / Breuss massage / Dorn practitioner stuff / Dorn practitioner anantomy / Dorn products / Dorn code of ethics / about Thomas Zudrell
NOTE: Never try to use the DORN Method on other people without proper training best conducted by an authorized DORN Method Instructor. Although the DORN Method and the Self Help Exercises are very safe if done correctly, the DORN practitioner is not responsible for any consequences resulting from the application during the manual session and Selfhelp exercises. In any case it is advised to consult your doctor first because health problems and back pains may have other causes than misaligned joints and vertebrae and should be checked by a trained medical doctor or other healthcare professional. The DORN Method has certain Limitations that must be cleared prior to any practical application! Remember: The DORN Method is NO Replacement for any other form of medical or non-medical treatment but it can be a very effective complement in an integrative medical system.
©copyright: AHHAI - Thomas Zudrell
Imprint - Contact - Links
Powered by "The Force"
